Canon i560 Waste Ink

I’m really pleased with my Canon i560 inkjet printer. It’s the main workhorse for all my printing tasks and I’ve had it for ages. It’s from the last generation before the manufacturers started to get devious and add chips to the cartridges. Each colour has a separate, transparent cartridge so you can see how much ink is left. It’s really easy to top up with a syringe when required. I haven’t bought a new cartridge for years.

One problem with inkjets is that the print head nozzles tend to clog up. The result is poor print quality with missing colours and poor resolution. To avoid it, manufacturers program in special cleaning routines to keep the ink flowing. That’s what all the whirring is about before printing starts.
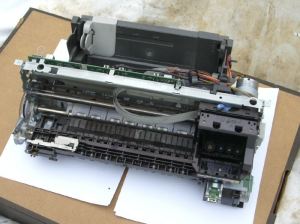
What happens is that the print head is parked on top of a vacuum pump that sucks ink through it. Which is well and good, but what happens to all this ink. Well, it usually discharges into a large sponge sitting in the bottom of the machine. This is the waste ink pad. Over time some of the liquid evaporates and what’s left is an extremely messy sponge full of ink residue.

Eventually this becomes full and the printer warns you with increasingly insistent service messages. After a while it refuses to print. You then have various options. You can throw it away or send it for an expensive repair. But, if you’re a hands-on sort of guy, you can replace or clean the waste ink pad yourself, or you can just reset the software so the warning goes away. The last is a fairly risky option. If the ink pad overflows you could end up with ink leaking all over your desk or floor.

When the warnings started on my i560 I decided to have a look inside. Gaining access was the first problem. I found some useful tips from Polymorph . Here’s my description of how to dismantle the case. Canon have kindly marked all the access tabs with little arrows. First remove the two side cheeks by inserting a screwdriver near the arrow and levering gently outwards. This allows the part to swing downwards so you can release it. Then work your way round the waistline of the case inserting a screwdriver at each arrow and separating the two halves. The top of the case lifts off, leaving the chassis sitting in the bottom part.

There are just two screws holding the chassis in place. They are towards the rear. The front edge just hooks in. After removing the screws you can lift out the chassis using the two nifty carrying handles at the top. Carefully unplug the wires from the power supply and be careful of the USB socket.
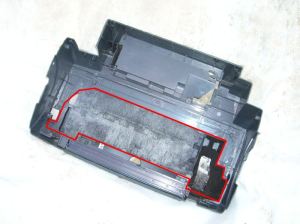
In the bottom half of the case you will see the waste ink pad. Fitting a new replacement would be ideal, but I couldn’t find them on sale. Some people report washing and drying them but this seems an extremely messy process. In my case I thought the pads had a few more years’ life, so I left them in. I did scrape up a lot of ink sludge from the discharge area. This should give me a bit more breathing space.

I then put everything back together and reset the warning with the magic button sequence that is widely reported on the net. One example is here.

Everything is working fine now.

Posted in Uncategorized | Leave a comment

SMTP email Submission

The basic SMTP submission dialogue goes like this. Red is the client that is sending the mail and blue is the server that is receiving it.

220 smtp.example.com ESMTP Postfix
HELO relay.example.org
250 Hello relay.example.org, I am glad to meet you
MAIL FROM:<bob@example.org>
250 Ok
RCPT TO:<alice@example.com>
250 Ok
DATA
354 End data with <CR><LF>.<CR><LF>
From: "Bob Example" <bob@example.org>
To: "Alice Example" <alice@example.com>
Date: Tue, 15 Jan 2008 16:02:43 -0500
Subject: Test message
This is a test message.
. . . . . . .

Notes

Notice that there are two sets of to and from addresses. The ones used in the SMTP dialog are the “envelope addresses”. There are also to and from fields inside the email that may be the same or different. Since the envelope address is only visible as part of the SMTP dialog, some servers helpfully copy it into the message as “Envelope-To:”

Beware that anything that the originating system sends might be forged. There is little to stop an untrustworthy client putting what it likes into the various fields. If you receive a spam email, the only field that’s likely to be correct is the Envelope-To. That’s why it came to you in the first place.

In olden days, the routing of email was quite difficult to achieve and systems would co-operate by relaying to help messages on their way. The process of a client submitting a message to a server is not much different from delivering it between servers. The same SMTP protocol is used for both. But there are moves to segregate these two types of traffic by port number.

Because of spam, nobody relays mail for other people any more. Messages are sent directly from the mail server in the originating domain to the server in the destination domain. A home user should submit all emails via the server at his ISP. To do this, he must authenticate himself and satisfy some basic sanity checks on the message content.

A home user should not normally be running his own email server and sending mail directly to other destinations. If he is, he is either a geek or his PC has a virus causing it to send out spam. So ISPs often block direct SMTP traffic. The easiest way is to put a total block on all traffic using the SMTP port, 25.

In order to submit mail, the user connects to his home server using a different port, 587. So traffic is segregated with server-to-server traffic using SMTP on port 25 and authenticated email submission using SMTP on port 587.

Posted in Uncategorized | Leave a comment

Aspect Ratios for Digital TV

Aspect Ratio can be confusing. It applies in different ways at different stages of the process of getting pictures on the screen.

The DAR or Display Aspect ratio is what you can measure with a ruler when a picture is correctly displayed. It’s the physical geometry of the image. Typical values are 4:3 for standard TV pictures and 16:9 for widescreen TV.

A digitally encoded TV picture usually contains a standard number of bits. For PAL, it’s 720 x 576 pixels. For NTSC (US) it’s 720 x 480 pixels. Curiously, neither of these correspond to the 4:3 physical geometry of the image.

Presumably this didn’t matter in the days when the studio and broadcasting systems were digital but home TV displays were analog. On a CRT display you could just twiddle the analog height and width controls until it looked right.

With the arrival of plasma and LCD displays it gets more complicated. The screen has a fixed matrix of dots that change colour. The horizontal and vertical dot pitch is usually the same, ie the dots are on a square grid. So having a simple one-to-one correspondence between the dots and the incoming data won’t work. This would squish the picture. You need some clever logic to interpolate between adjacent pixels and decide how to display them.

Another curiosity is the number of bits doesn’t usually change between widescreen (16:9) and standard (4:3) pictures. The data still contains 720 x 576 pixels on the PAL system. It just has to be stretched differently for display.

You can define other aspect ratios. The SAR or Storage Aspect Ratio corresponds to the number of pixels in the encoded picture. For a 720 x 576 picture the SAR is 5:4. For 720 x 480 it is 3:2. The PAR or Pixel Aspect Ratio corresponds to the shape of pixels required to display the picture correctly. They are linked by the formula DAR = SAR x PAR.

This all applies to standard definition TV. High definition is another story. For a wealth of more detailed information see these articles from someone who really understands this stuff.

Posted in Uncategorized | Tagged , , , | Leave a comment

Metal Bending Brake – Geometry

I’ve been experimenting with various tools for bending sheet metal. The best thing seems to be a dedicated bending brake. The workpiece (labelled A-B) is clamped between two blocks, C and D. The moving leaf E swings up through 90 degrees to position E2 to form the bend.

There are several DIY designs on the net. Despite a lot of research, I remained puzzled about some features of the geometry. In particular, the motion of the moving leaf and the ideal location for the pivot point. I think I’ve now solved it to my satisfaction.

As the metal bends the outside is stretched and the inside is compressed. There is a line somewhere in the middle that remains neutral. You might think it’s exactly in the middle, but it’s usually nearer the inside of the curve. The exact location is given by a parameter called the K-factor.

To avoid damaging the workpiece, it would be nice if the moving leaf kept in steady contact with it, avoiding any messy scraping along its surface. To achieve this, you need to imagine the metal curling and uncurling along the neutral line and identify corresponding points before and after bending. The picture shows this for typical dimensions and a K-factor of 0.5. The positions of E and E2 are such that the length of the neutral line around the curve is equal to the straight line distance.

So the moving leaf has to move between two defined positions and this movement consists of a rotation plus a translation. But is it possible to specify a simple pivot point so that the motion is a pure rotation? The answer is yes, but the principle eluded me for a while. It’s shown in red. You link of corresponding points on E and E2, then draw lines at 45 degrees from each end. Where they cross is the required pivot point, P.

The picture shows the sharpest bend you’re likely to attempt with an inside radius equal to the material thickness. You can also imagine on the picture the gentlest bend you can make in a workpiece of near-zero thickness. This corresponds to the outside skin of the original material A-B. For convenience in drawing, the moving leaf still ends up at E2. But it begins in a different starting position to the right of the original E. I’ve not shown it, but I have shown the construction lines in grey and the associated pivot point P’.

What should we make of all this? Well, ideally, to avoid scraping, the pivot point should move between P1 and P2 as we bend different thicknesses. However, the effect is quite slight. It’s probably adequate if we forget all this clever stuff and go for ease of construction. So just locate the pivot point in the plane of clamping block C. This simplified geometry seems to be used by most of the existing designs.

What is important is the setback distance to allow for the bend. So for practical purposes, we can fix the pivot point at P* which is in line with the lower clamp and setback by the required setback distance.

I’ll discuss practical design details in my next post.

Posted in Uncategorized | Tagged , , , , | Leave a comment

Sending email newsletters

I want to send out newsletters to all the members of my club. What’s the best way to do it? Say there are 100 recipients.

First of all make absolutely sure you are not spamming people. Only send your newsletter to people who have agreed to receive it. Either they explicitly requested it or there is some existing relationship between you and them. Don’t send it to random addresses you found on the Internet just because you thought they might be interested.

How you send it is important. Some of the obvious methods may not work too well. And, if your email looks like spam, it may get discarded, often without any feedback to you.

1. Using your regular email program. In your email program, Outlook Express, Thunderbird, etc, simply fill in the TO or CC line with all the recipients’ addresses. The result is a single email addressed to, say, 100 people. This will annoy many of your recipients, as every address will be visible to everyone else. Someone could steal your complete list and use it to send spam to your members.

2. Using your regular email program with BCC. This is what BCC or Blind Carbon Copy was invented for. If you enter the recipients as BCC then each recipient only sees their own address. All the others are hidden. The trouble is this technique is so widely used by spammers that many servers are rightly suspicious. An email with 100 BCC addresses will often get deleted without any warning. See here.

3. Use a bulk emailer. You really need a specially written program for this job. There are lots around such as Groupmail and Sendblaster. What the mailer does is merge your standard email with a list of recipients. Then it submits them as individual emails, addressed to each person individually. You usually get tools to create the email, manage the list and personalise the email (eg Dear John). You can often download a free trial version to handle a limited number of addresses.

Some programs give you the choice of running your own SMTP server or sending via the server at your ISP. Although having your own server sounds attractive, it won’t work with many destinations. They only like to talk to “proper” mail servers and won’t talk to your server on a dodgy, dynamic IP address. When you submit your emails via your ISP, check if they have any bulk sending limits. If the server thinks you’re spamming, it may cut you off. To get round this you can tell the mailer to send a fixed number of emails then pause for a certain time before sending more.

I’ve been using Groupmail for a while now and it seems to do the job very efficiently.

Posted in Uncategorized | Tagged , , , , , | Leave a comment

Hello

I’ve just set up this blog so I can note down any useful technical stuff I discover. The idea is, instead of writing it in my private notebook, I make it available to the world.

If you visit here and discover something useful, please link to this site. All information is copyright. Please don’t steal my information and display it elsewhere.

Posted in Uncategorized | Tagged , , | Leave a comment