I’m really pleased with my Canon i560 inkjet printer. It’s the main workhorse for all my printing tasks and I’ve had it for ages. It’s from the last generation before the manufacturers started to get devious and add chips to the cartridges. Each colour has a separate, transparent cartridge so you can see how much ink is left. It’s really easy to top up with a syringe when required. I haven’t bought a new cartridge for years.
One problem with inkjets is that the print head nozzles tend to clog up. The result is poor print quality with missing colours and poor resolution. To avoid it, manufacturers program in special cleaning routines to keep the ink flowing. That’s what all the whirring is about before printing starts.
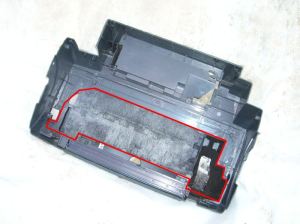
 What happens is that the print head is parked on top of a vacuum pump that sucks ink through it. Which is well and good, but what happens to all this ink. Well, it usually discharges into a large sponge sitting in the bottom of the machine. This is the waste ink pad. Over time some of the liquid evaporates and what’s left is an extremely messy sponge full of ink residue.
Eventually this becomes full and the printer warns you with increasingly insistent service messages. After a while it refuses to print. You then have various options. You can throw it away or send it for an expensive repair. But, if you’re a hands-on sort of guy, you can replace or clean the waste ink pad yourself, or you can just reset the software so the warning goes away. The last is a fairly risky option. If the ink pad overflows you could end up with ink leaking all over your desk or floor.
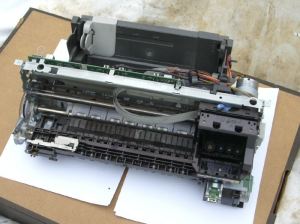
When the warnings started on my i560 I decided to have a look inside. Gaining access was the first problem. I found some useful tips from Polymorph . Here’s my description of how to dismantle the case. Canon have kindly marked all the access tabs with little arrows. First remove the two side cheeks by inserting a screwdriver near the arrow and levering gently outwards. This allows the part to swing downwards so you can release it. Then work your way round the waistline of the case inserting a screwdriver at each arrow and separating the two halves. The top of the case lifts off, leaving the chassis sitting in the bottom part.
There are just two screws holding the chassis in place. They are towards the rear. The front edge just hooks in. After removing the screws you can lift out the chassis using the two nifty carrying handles at the top. Carefully unplug the wires from the power supply and be careful of the USB socket.
 In the bottom half of the case you will see the waste ink pad. Fitting a new replacement would be ideal, but I couldn’t find them on sale. Some people report washing and drying them but this seems an extremely messy process. In my case I thought the pads had a few more years’ life, so I left them in. I did scrape up a lot of ink sludge from the discharge area. This should give me a bit more breathing space.
I then put everything back together and reset the warning with the magic button sequence that is widely reported on the net. One example is here.
Everything is working fine now.

